 Continue with Google
 TL;DR
- Back up: capture the listing in Live Listings and Catalog Lookup.
- Create: in the Publish Queue, create a new ASIN under a temporary SKU with a fresh UPC (or GTIN exemption) and a partially-modified title, highlight, bullets and description — every other attribute carried over — while a DELETE row removes the old listing in the same batch.
- Rebuild: restore the original copy on the new ASIN, then rebuild your original SKU on it using the new ASIN as the
externally_assigned_product_identifier. - Move stock: a one-line support case remaps your FBA inventory. Product, warehouse stock and SKU all stay put; only the ASIN changes.
Introduction
Refurbishing a listing means migrating an existing FBA product onto a brand-new ASIN — while keeping the SKU, the FNSKU labels, and every unit already sitting in Amazon's warehouses. Sellers do it to start a listing fresh and regain new-product momentum, without touching physical inventory.
The whole play is four moves:
- Before: you have SKU1 → ASIN1 (the old listing).
- Create: create a new product under a temporary SKU2 — partially modify the title, highlight, bullets and description, keep every other attribute — and Amazon assigns a fresh ASIN2.
- Re-home: delete the old listing, then rebuild SKU1 pointing directly at ASIN2. From now on SKU1 → ASIN2.
- Move stock: FBA units still reference ASIN1; one support case remaps them to ASIN2. Done.
Doing this in Seller Central means juggling flat files, category templates and inventory loader quirks. With SellerSheet's Catalog spreadsheet, the entire workflow lives in three tabs — Live Listings (backup & verification), Catalog Lookup (Amazon-side backup) and the Publish Queue (every create / update / delete submission).
Variables Used Throughout This Guide
- SKU1: your original SKU, the one you keep — e.g.
KB-2088-BLK. - ASIN1: the old ASIN you're leaving behind — e.g.
B0XXXXXXX1. - SKU2: a temporary SKU used to create the new ASIN — e.g.
KB-2088-BLK-08141030(SKU1 + timestamp). - ASIN2: the brand-new ASIN, your listing's new home — e.g.
B0XXXXXXX2.
Prerequisites
- Store Authorization: your Amazon store connected on the SellerSheet Dashboard, with write access.
- An identifier that won't collide with ASIN1: either a fresh, unused UPC, or a category with GTIN exemption (identifier left empty).
- The Catalog spreadsheet with its Live Listings, Catalog Lookup and Publish Queue tabs (created by the SellerSheet sidebar).
- Variation children only: note the parent SKU, variation theme and theme attribute values before you start — you'll restore the relationship at the end.
Never Reuse the Old UPC
Amazon matches products by GTIN before it ever looks at your title. Submit SKU2 with ASIN1's UPC and it attaches straight back to ASIN1 — no new ASIN is ever created. This single mistake is the most common reason the whole workflow fails.
Getting Around the Sidebar
Four habits make the whole workflow self-explanatory — the sheet documents itself:
- The sidebar menu must match the active sheet tab. Each section (Live Listings, Catalog Lookup, Publish Queue…) is sheet-specific — the sidebar even says "active tab must match". If a button seems to do nothing, check which tab is active at the bottom of your spreadsheet.
- Hover any button to see a tooltip explaining exactly what it does before you click.
- Read the cell notes. Header cells carry notes (the small corner marker) describing how the column is used, accepted values, and examples — hover to read them.
- Publish Queue row 4 is the built-in manual. For every attribute column, row 4 shows its display name plus a format hint and example (e.g.
[P9_type_value_pair → split] Externally Assigned Product Identifier · Type); row 5 is the code key the server reads.
Phase 1: Back Up Everything First
The Problem
This workflow deletes a live listing on purpose. If anything goes sideways and you didn't capture every attribute first, you're rebuilding a listing from memory — titles, bullets, dimensions, compliance fields, all of it.
1a. Live Listings — Back Up What You Submitted
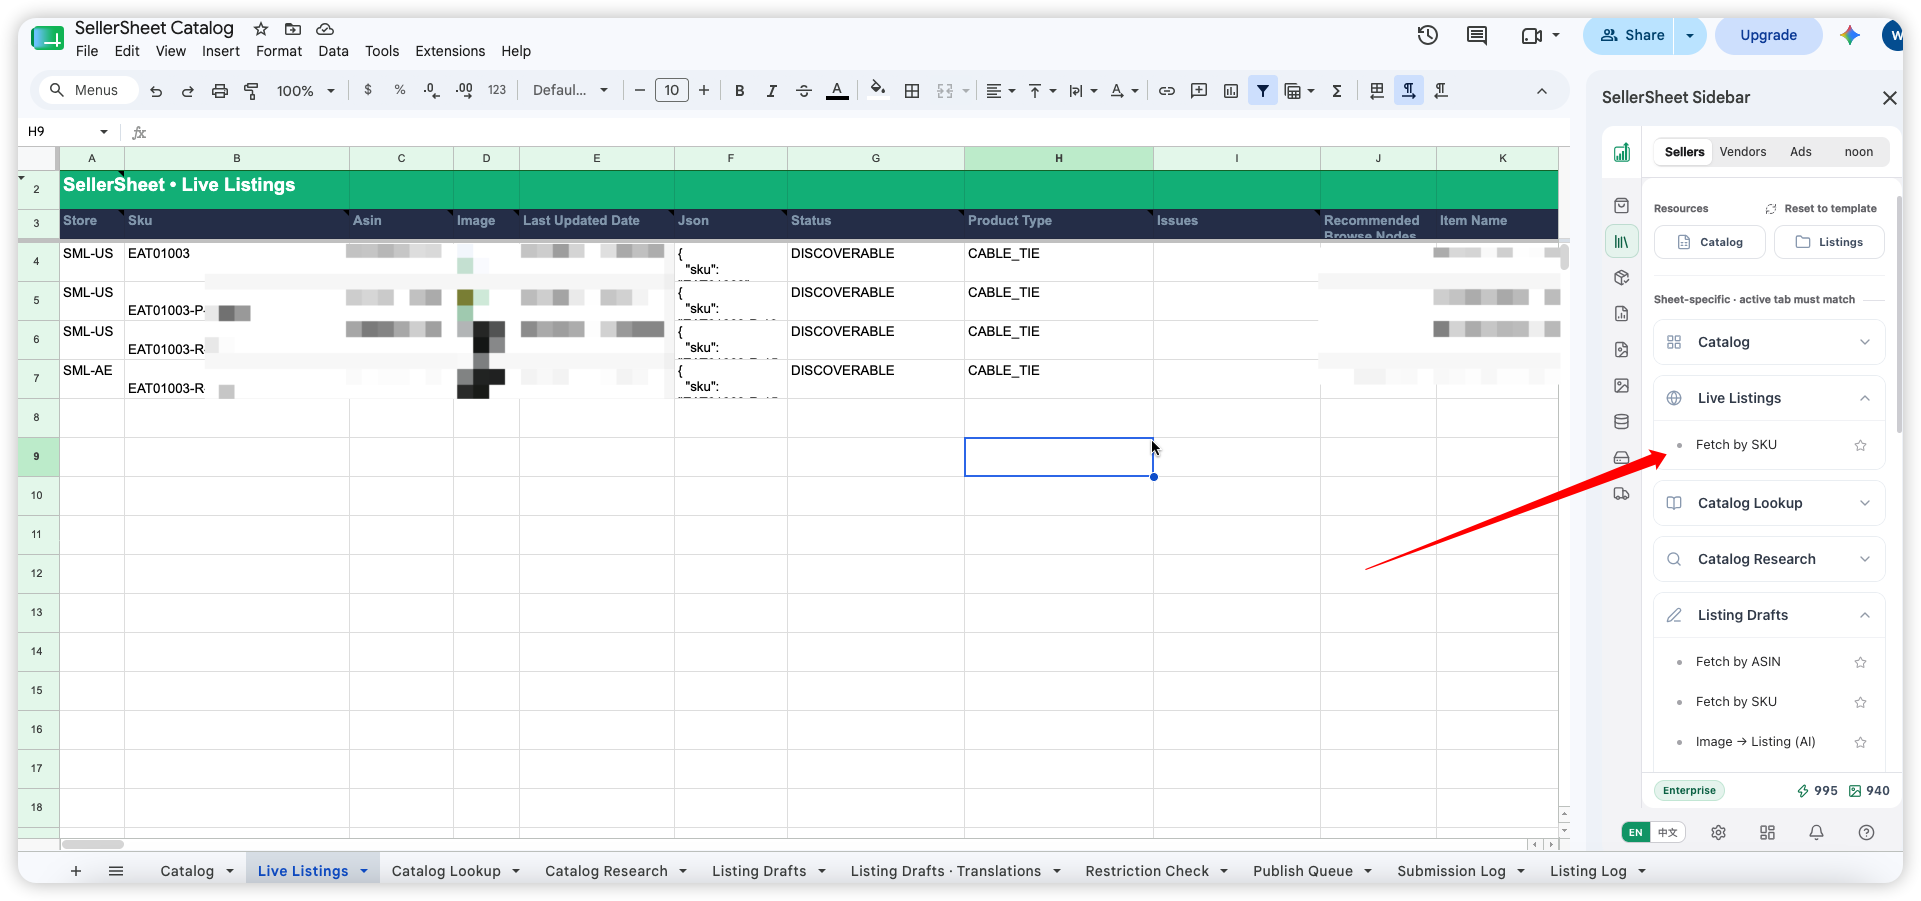
Open the Live Listings tab. Enter your store in the Store column and SKU1 in the Sku column, then click Live Listings → Fetch by SKU in the sidebar. The row fills in — and the Json column now holds a complete JSON backup of every attribute on the listing. That's your restore source. Note the Asin column value: that's ASIN1.
1b. Catalog Lookup — Back Up What Amazon Accepted
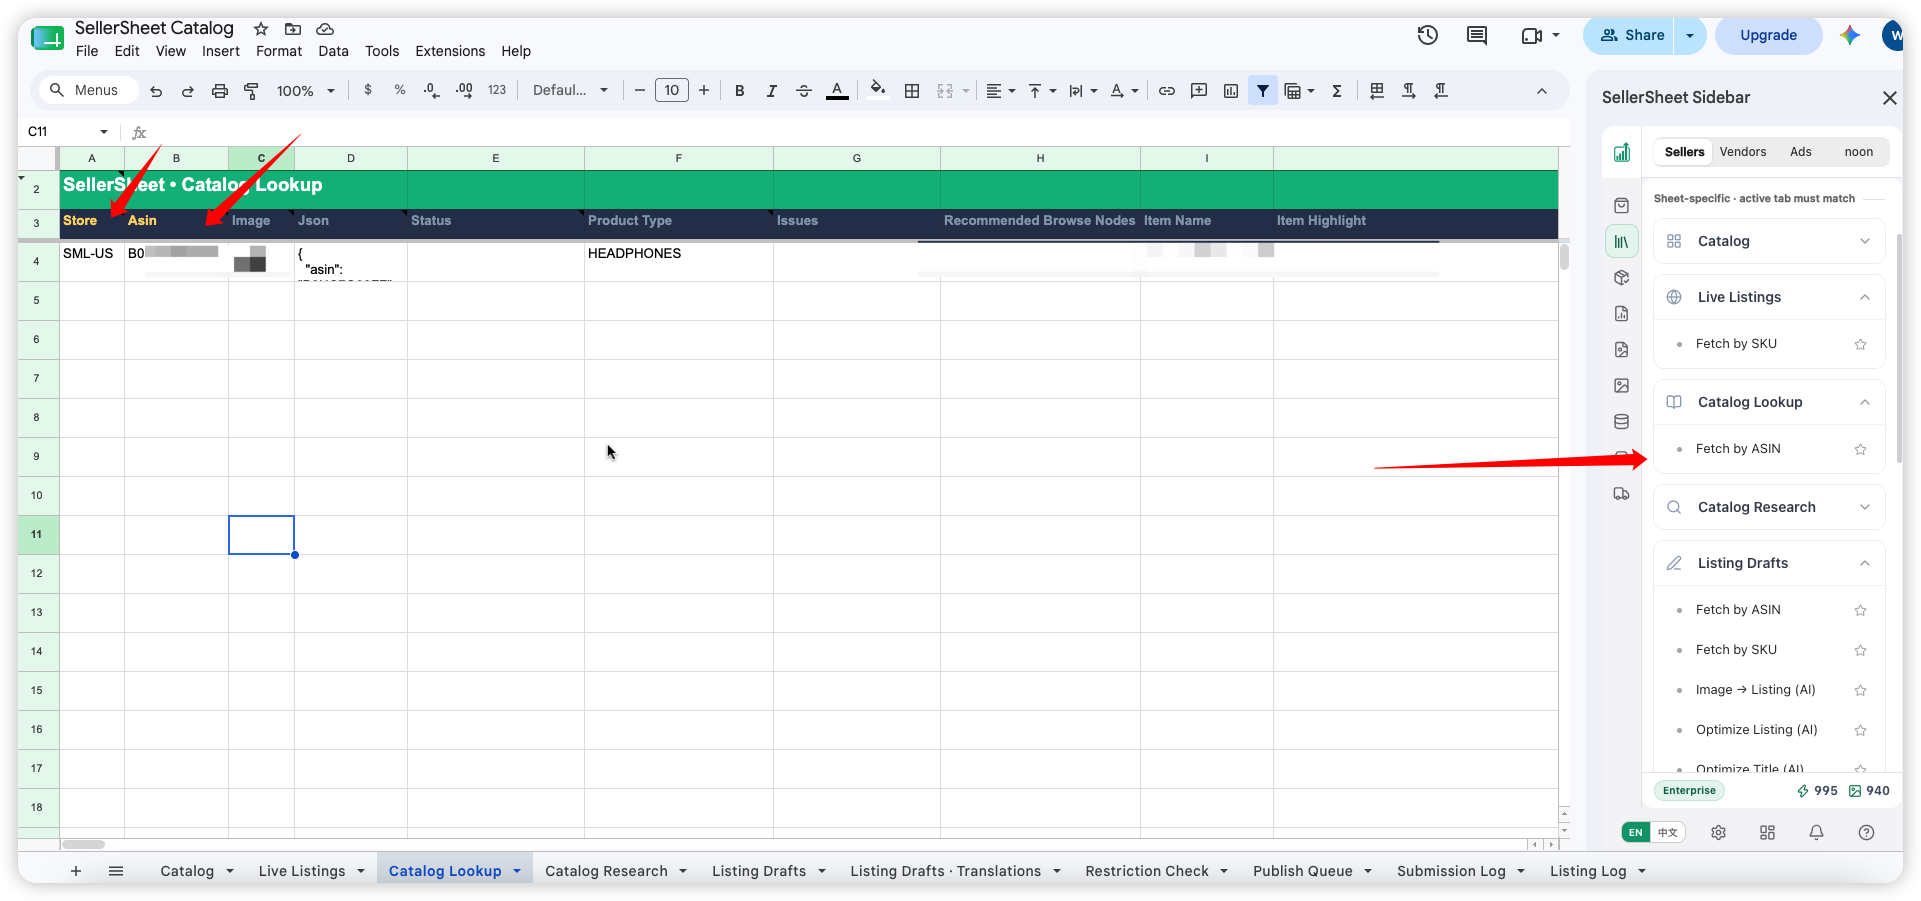
Switch to the Catalog Lookup tab, enter the store and ASIN1, and click Catalog Lookup → Fetch by ASIN. This captures Amazon's catalog-side, normalized version of your listing — useful for spotting what Amazon rewrote, and as evidence for the support case later.
Phase 2: Create the New ASIN
The Problem
You can't just "ask Amazon for a new ASIN" — the catalog exists to prevent duplicates. Submit the same product unchanged and Amazon binds your new SKU straight to the ASIN you're trying to escape.
Here's the balance this phase walks: the new listing must carry the old ASIN's attributes — the Phase 4 support case depends on the two ASINs matching. But submit them 100% identical and Amazon decides the product already exists and binds SKU2 to ASIN1; differ too much and changing the copy back after creation sometimes fails. So: keep every attribute from the old listing, and partially modify only four copy fields — Item Name, Item Highlight, Bullet Point, Product Description — just enough for Amazon to treat it as a new product. Once the new ASIN is created, those four fields are changed back to the old ASIN's exact content (Phase 3, step 1).
1. Load the Product into the Publish Queue
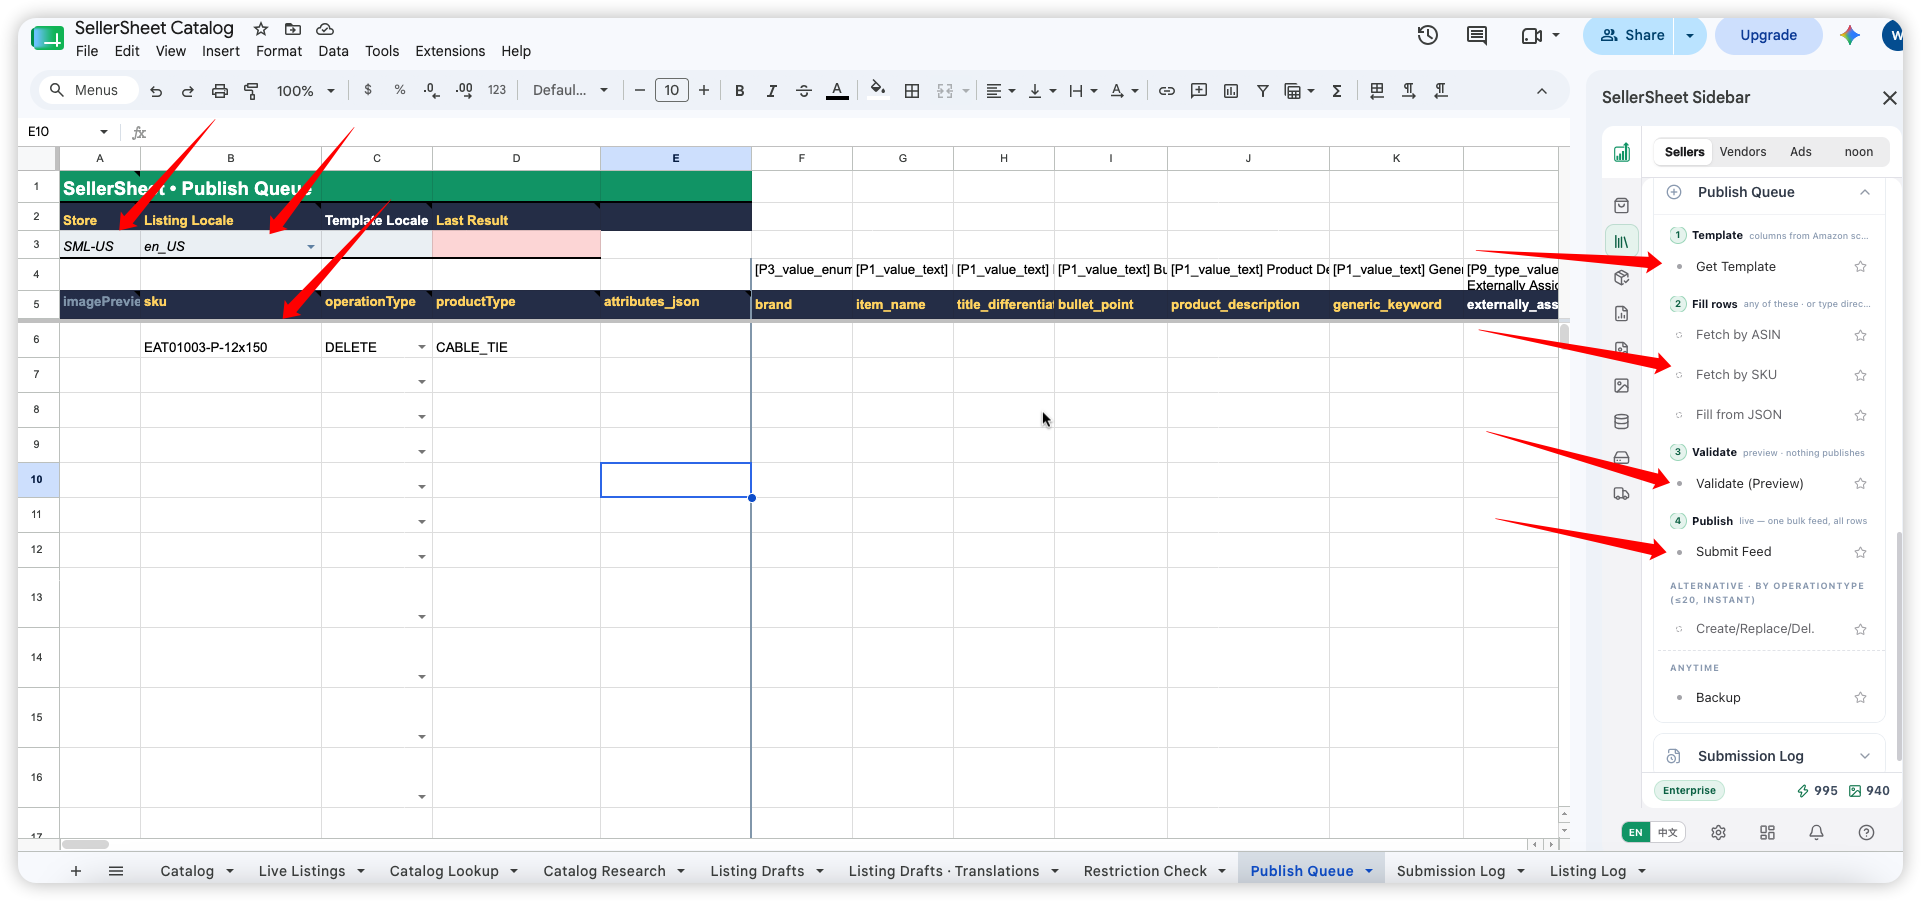
Switch to the Publish Queue tab and follow the numbered groups in the sidebar:
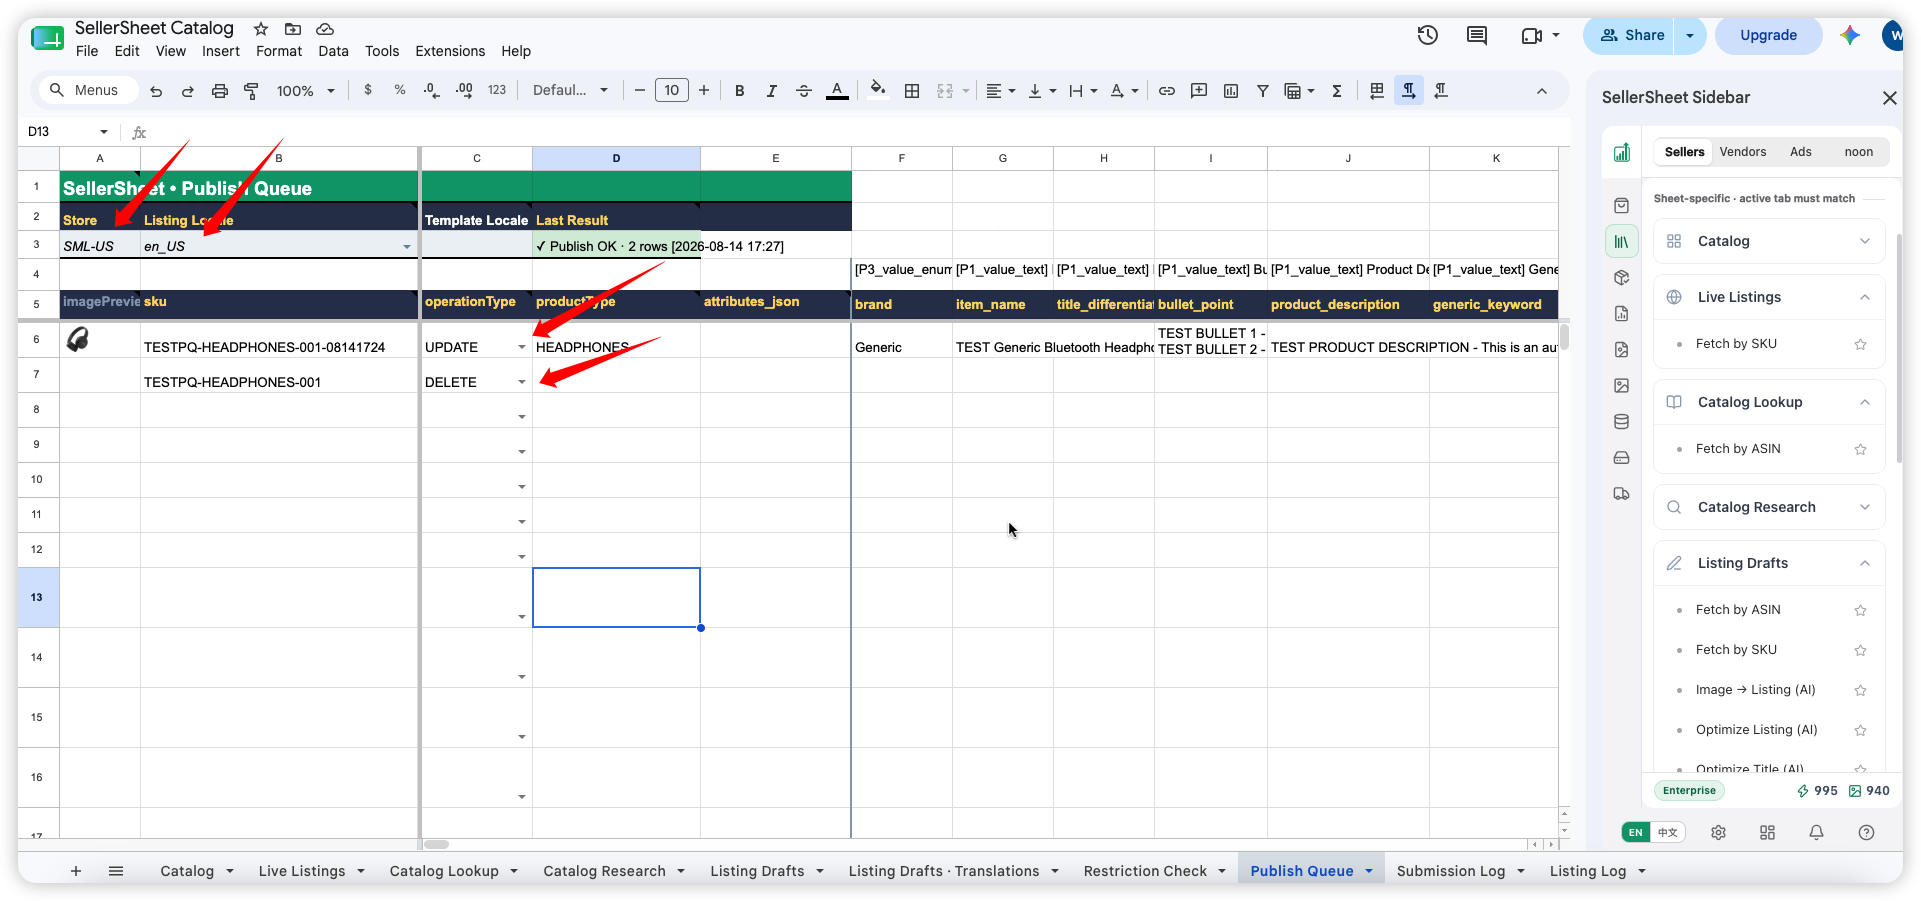
- Fill Store and Listing Locale (e.g.
en_US) in row 3. - Enter the productType from your Live Listings backup (e.g.
HEADPHONES) in the data row. - Click Get Template — it loads every attribute column for that category, like downloading the category's Excel template from Seller Central, but in-sheet.
- Put SKU1 in the sku column and click Fetch by SKU — the whole row populates.
2. Edit the Row into a "New Product" (SKU2)
| Column | Change To |
|---|---|
| sku | SKU2 — e.g. KB-2088-BLK-08141030 (SKU1 + timestamp) |
| operationType | UPDATE |
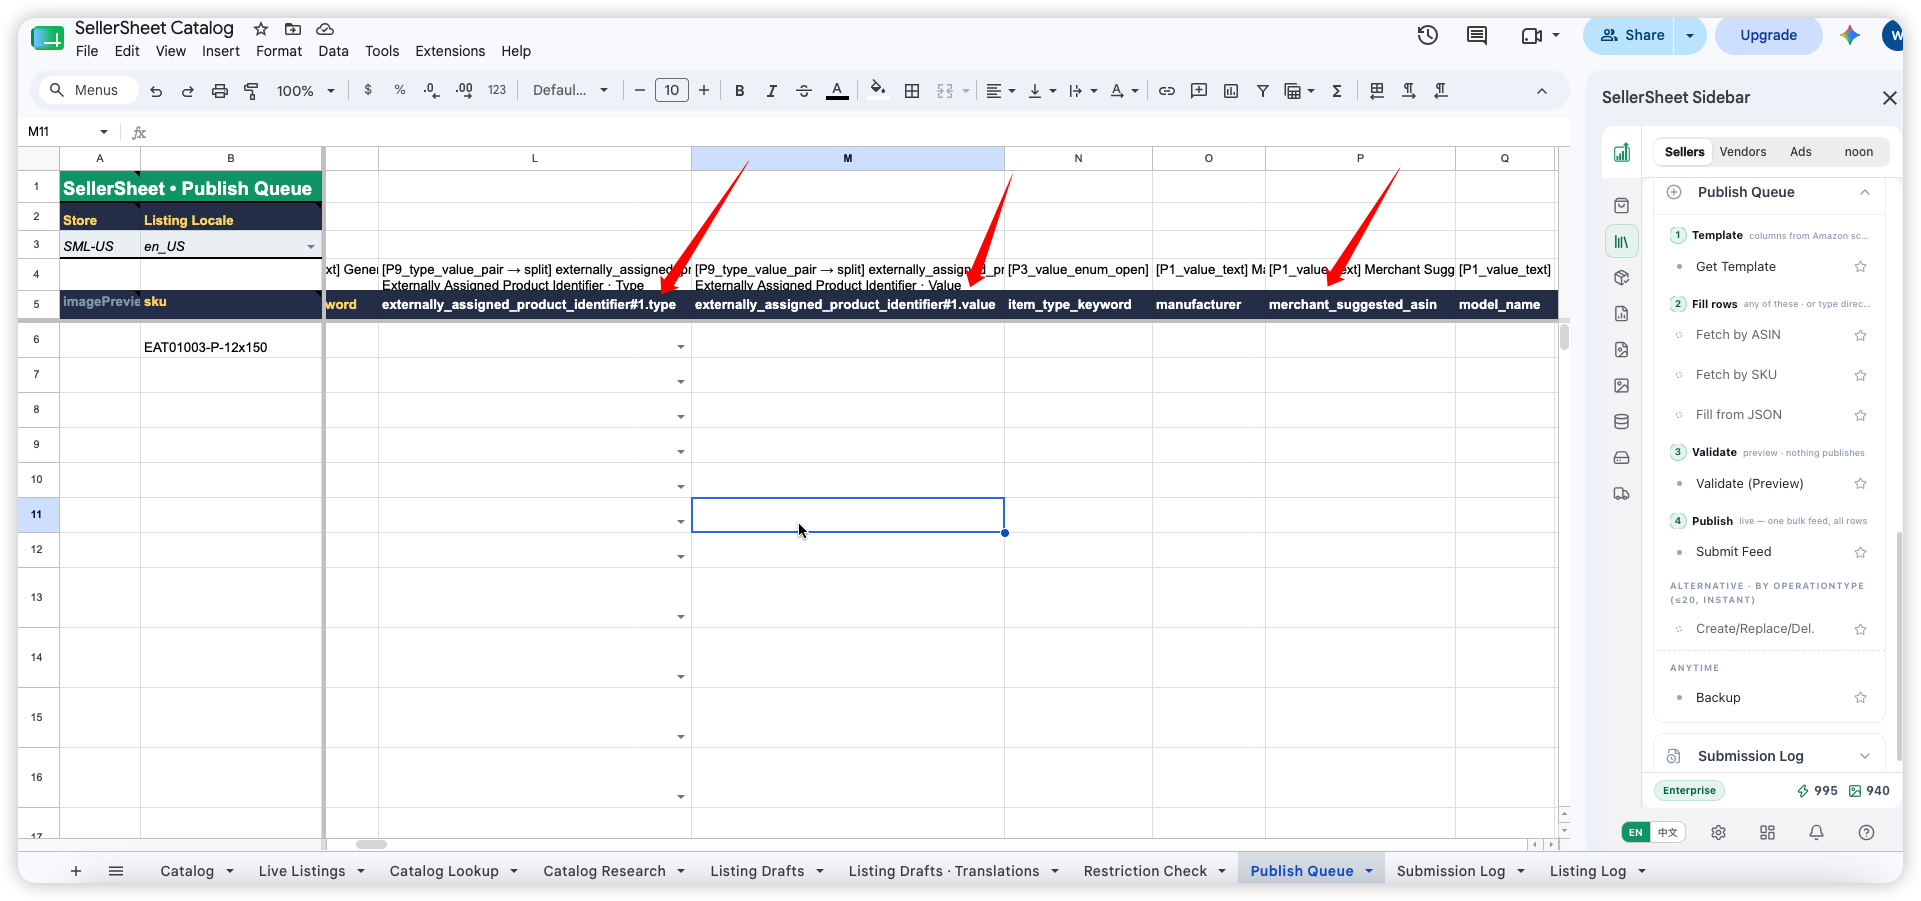
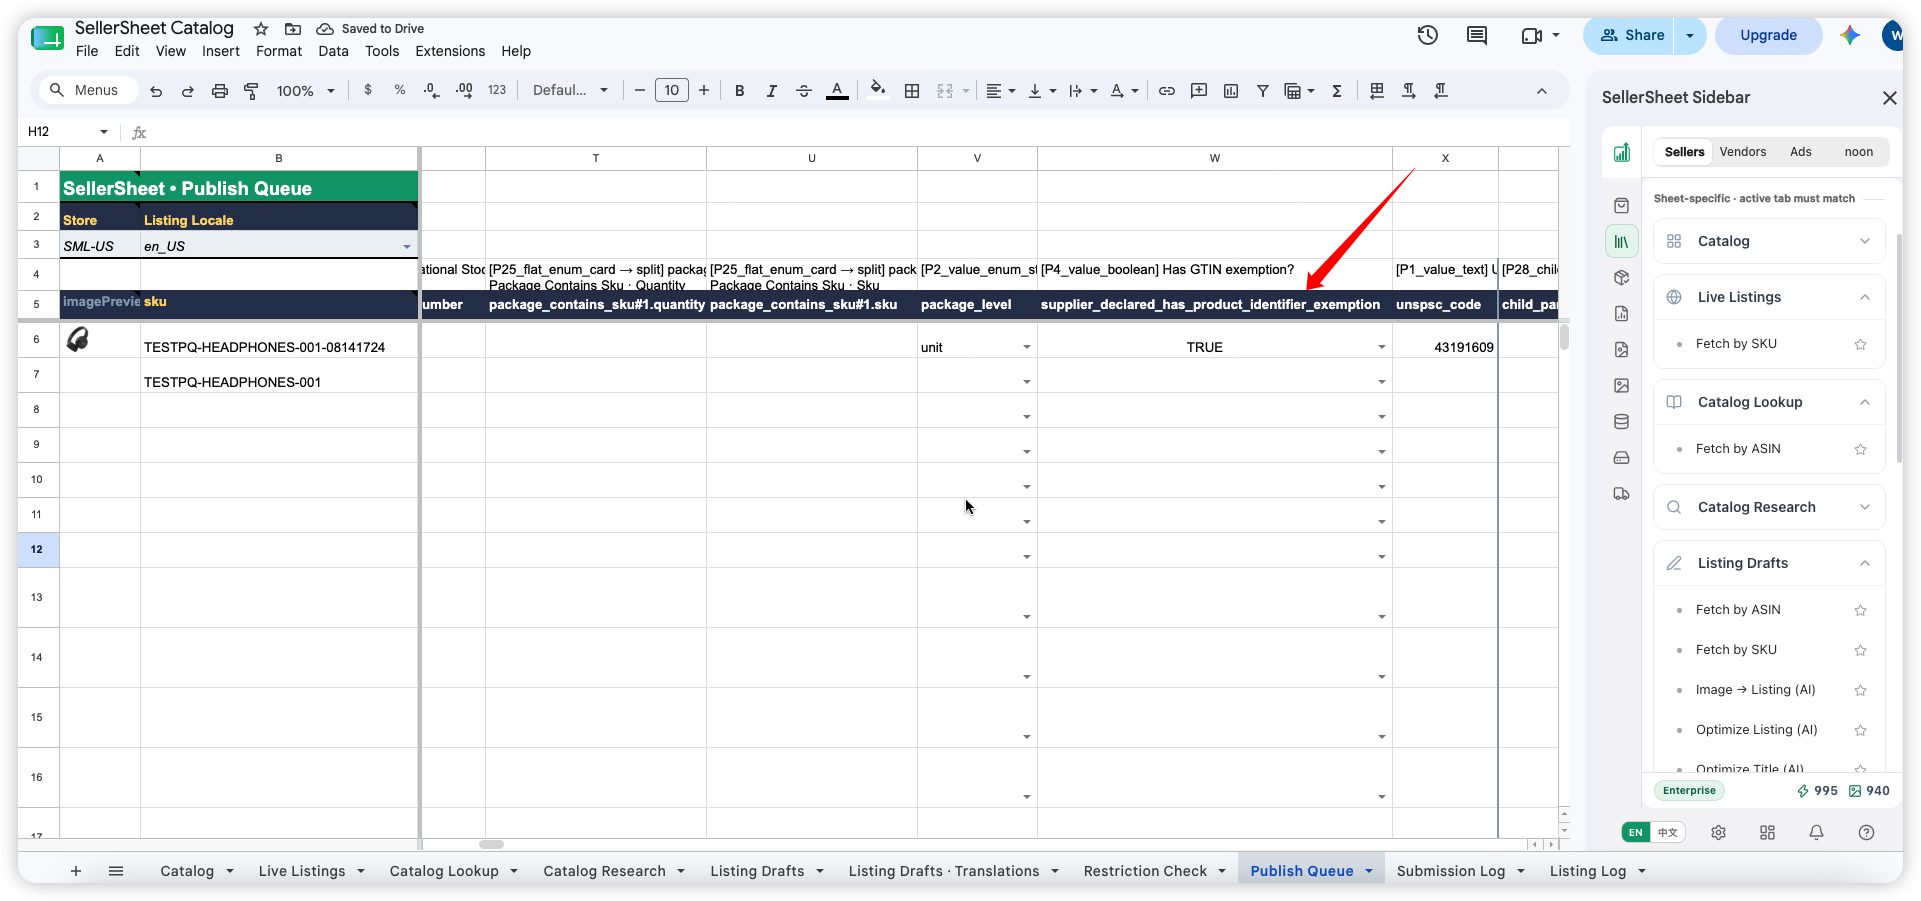
| externally_assigned_product_identifier#1.value | Fresh UPC — or empty if GTIN-exempt |
| externally_assigned_product_identifier#1.type | upc — or empty if GTIN-exempt |
| supplier_declared_has_product_identifier_exemption | true if GTIN-exempt; otherwise leave empty |
| product_site_launch_date | Clear it if it carries the old SKU's past date |
| item_name / title_differentiation / bullet_point / product_description | Partially modify (see below) |
Why does creating use UPDATE? UPDATE submits the full listing: if the SKU doesn't exist it is created; if it exists it is overwritten. There is no separate "create" operation — SKU2 takes UPDATE too.
Modify, don't rewrite from scratch. Touch only the four copy fields and change them just enough that duplicate detection sees a new product — restructure the title, reword the highlight and bullets, rephrase the description. Change too little and SKU2 merges back into ASIN1; go far beyond these four fields and restoring the original content later can fail. Everything else stays identical to the old listing.
If SKU1 is a variation child, also clear parentage_level, child_parent_sku_relationship, variation_theme and the theme attributes (e.g. color / size) — create it as a standalone product and restore the variation at the end.
3. Add a DELETE Row for SKU1 in the Same Batch
On the next empty row, enter SKU1 in the sku column and set operationType to DELETE. That's it — a delete row needs only those two cells. Creating SKU2 and deleting the old listing in the same batch frees SKU1 up, so you can rebuild it on the new ASIN2 in Phase 3.
4. Validate, Then Submit
Click Validate (Preview) and check the Submission Log tab for ERROR-level issues — validation is a preview, nothing publishes. Once clean, click Create/Replace/Del. to submit (instant for up to 20 rows, dispatched per row's operationType; use Submit Feed for larger batches).
5. Verify ASIN2 Was Born
Wait 10–15 minutes. In Live Listings, fetch SKU2 and read the Asin column — that's ASIN2. The critical check: ASIN2 ≠ ASIN1. You can cross-check in Seller Central too.
Got the Old ASIN Back?
If SKU2 returns ASIN1, Amazon merged it — the four copy fields weren't different enough (or the identifier matched). Delete SKU2, increase the changes to those four fields, and resubmit.
Phase 3: Rebuild Your SKU on the New ASIN
The Problem
ASIN2 exists, but it's living on a throwaway SKU with placeholder copy. Your real SKU — the one your FBA inventory, ads and operations are built around — is deleted and homeless. And if the two ASINs don't look like the same product, support will refuse to move your inventory.
1. Restore the Original Copy on SKU2 First
Before rebuilding SKU1, copy the original copy from your Phase 1 Live Listings backup back onto the SKU2 row and submit with operationType=UPDATE. The column mapping:
Column Mapping — Backup Tabs → Publish Queue
- Item Name →
item_name - Item Highlight →
title_differentiation - Bullet Point →
bullet_point - Product Description →
product_description
Live Listings / Catalog Lookup use display names; Publish Queue row 4 shows the display name and row 5 the code key.
Why this matters: it makes ASIN2's attributes identical to ASIN1's. When you open the support case in Phase 4, support can't reject the remap on the grounds that the two ASINs are different products. After submitting, fetch SKU2 in Live Listings once more and confirm it still resolves to ASIN2.
In the same submission, lock the identifier to the new ASIN — so every later update lands on the newly created ASIN (with the identifier left empty, Amazon can sometimes spawn yet another listing):
| Column | Set To |
|---|---|
| externally_assigned_product_identifier#1.value | ASIN2 |
| externally_assigned_product_identifier#1.type | asin |
| merchant_suggested_asin | ASIN2 |
| operationType | UPDATE (required) |
Identifier and GTIN exemption are mutually exclusive: if SKU2 was created via exemption (supplier_declared_has_product_identifier_exemption = TRUE), clear the TRUE first — it cannot coexist with externally_assigned_product_identifier.
2. Rebuild SKU1 Pointing at ASIN2
Back in the Publish Queue:
- The row's attributes already match SKU1 exactly and the identifier points at ASIN2 from the previous step — just change the sku cell to SKU1, with
operationType=UPDATE. - Confirm SKU1 is fully deleted — Fetch by SKU on SKU1 in Live Listings shows
SKU … not foundin the Json column. If it still resolves, wait and re-check before submitting. - Validate (Preview) → Create/Replace/Del.
3. Verify the Rebuild
- Live Listings — fetch SKU1: the Asin column should now read ASIN2.
- Seller Central — Manage All Inventory shows SKU1 / ASIN2; Fix Stranded Inventory shows SKU1 / ASIN1. The stranded entry is expected — your FBA units still reference the old ASIN until Phase 4.
A Successful Feed Is Not Proof
Amazon "successfully" accepts operations on SKUs that don't exist. Always confirm the result by fetching the SKU in Live Listings or checking Seller Central — never by the feed status alone.
Phase 4: Move the FBA Inventory & Clean Up
The Problem
Your listing lives on ASIN2, but every unit in Amazon's warehouses still references ASIN1 — stranded and unsellable. Creating removal orders and re-shipping would cost weeks and real money.
1. Open the Support Case
Go to Seller Central → Help → Get support → Selling on Amazon → Products and inventory → Fix a product page, and use this one-liner (swap in your own SKU1 and ASIN2):
They represent the same product. Thanks!
If support asks for evidence, provide a Manage All Inventory screenshot and your Phase 1 Catalog Lookup backup showing the two ASINs are the same product. Once processed, the stranded entry clears and your stock is sellable under ASIN2 — no relabeling, no new shipment.
2. Clean Up
- Delete SKU2 — after the remap it's just a duplicate empty offer on ASIN2 that can interfere with pricing and the Buy Box. Add a DELETE row in the Publish Queue.
- Restore the variation (children only) — re-add
parentage_level=child,child_parent_sku_relationship,variation_themeand a theme attribute value that doesn't clash with existing siblings. - Archive the backup rows, the case ID and the timeline.
Common Pitfalls
| Pitfall | Consequence | Avoid It |
|---|---|---|
| Reusing the old UPC on SKU2 | Attaches straight back to ASIN1 — no new ASIN | Fresh UPC, or GTIN exemption with the identifier left empty |
| Modifying the copy too timidly | Duplicate detection merges SKU2 into ASIN1 | Partially modify the four copy fields; always verify ASIN2 ≠ ASIN1 |
| Rebuilding SKU1 before it's released | The SKU can re-link to its old catalog data | Confirm SKU1 is gone first; always set merchant_suggested_asin to ASIN2 |
| Trusting the feed status | The listing may not actually exist | Verify by fetching the SKU in Live Listings or in Seller Central |
| Forgetting to delete SKU2 | Duplicate offer on the same ASIN | Clean up in Phase 4 after the inventory remap |
| Leaving variation attributes on a child | Creation errors, or the child re-attaches to the parent | Clear variation columns in Phase 2; restore them in Phase 4 |
Frequently asked questions
Do I need to relabel or move my FBA inventory?
No. FBA inventory is tied to the FNSKU, which never changes in this workflow. After you rebuild your SKU on the new ASIN, a short support case asks Amazon to remap the existing inventory — no removal orders, no relabeling, no new shipment.
Why does the temporary SKU need a new UPC or GTIN exemption?
Amazon matches products by GTIN before it looks at your title. If the temporary SKU carries the old UPC, it attaches straight back to the old ASIN and no new ASIN is created. Use an unused UPC, or leave the identifier empty and set the GTIN exemption flag if your category allows it.
My temporary SKU came back with the OLD ASIN — what went wrong?
Either the identifier matched (same UPC) or the four modified copy fields were still too similar, so Amazon's duplicate detection merged it into the existing ASIN. Delete the temporary SKU, increase the changes to those four fields, and resubmit.
Why does Fix Stranded Inventory show my SKU with the old ASIN?
That is expected mid-workflow. Manage All Inventory shows your SKU on the new ASIN, while the FBA units still reference the old ASIN until the support case remaps them. Once the case is processed, the stranded entry clears and the stock is sellable under the new ASIN.
Can I refurbish a variation child?
Yes. Note the parent SKU, variation theme and theme attribute values first, clear the variation columns when creating the temporary SKU, and re-attach the rebuilt SKU to the parent at the end — using a theme value that does not clash with existing siblings.
Why restore the original copy before rebuilding the SKU?
The support case succeeds when the two ASINs clearly represent the same product. Restoring the original title, bullets and description makes the new ASIN's attributes identical to the old one, so support has no grounds to reject the remap as a different product.
速览
- 备份:在 Live Listings 和 Catalog Lookup 里双重备份。
- 创建:在 Publish Queue 用临时 SKU + 全新 UPC(或 GTIN 豁免),修改部分标题、五点、描述等文案后创建新 ASIN,其余属性全部沿用;同批的 DELETE 行删掉旧 listing。
- 重建:把原版文案写回新 ASIN,再把新 ASIN 作为
externally_assigned_product_identifier,把原 SKU 重建到新 ASIN 上。 - 搬库存:开一个一句话的 case,客服把 FBA 库存映射过去。商品、库存、SKU 全部不动,变的只有 ASIN。
前言
翻新 listing,指把一个在售 FBA 商品整体迁移到一个全新的 ASIN 上——SKU、FNSKU 标签、以及所有已经躺在亚马逊仓库里的库存都保持原样。卖家用它让 listing 从零开始、重新获得新品期的流量,而完全不碰实体库存。
整个玩法就四步:
- 原来:你有 SKU1 → ASIN1(老 listing)。
- 新建:用临时 SKU2,修改部分标题、五点、描述等文案后创建新品——其余属性沿用旧 listing——亚马逊分配全新的 ASIN2。
- 换家:删掉旧 listing,再用 SKU1 重建、直接指向 ASIN2。从此 SKU1 → ASIN2。
- 搬库存:FBA 库存还认 ASIN1,开一个 case,客服把库存映射到 ASIN2。搞定。
在卖家平台手工做这件事意味着和批量模板、类目表格、库存加载器缠斗。而在 SellerSheet 的 Catalog 表格里,整个流程只用三个标签页:Live Listings(备份与验证)、Catalog Lookup(亚马逊侧备份)和 Publish Queue(所有创建/更新/删除提交)。
全文变量约定
- SKU1:原 SKU,最终要保留的——如
KB-2088-BLK。 - ASIN1:要甩掉的旧 ASIN——如
B0XXXXXXX1。 - SKU2:用来创建新 ASIN 的临时 SKU——如
KB-2088-BLK-08141030(SKU1 + 时间戳)。 - ASIN2:全新 ASIN,listing 的新家——如
B0XXXXXXX2。
前置条件
- 店铺已授权:店铺已连接 SellerSheet Dashboard,且有写权限。
- 一个不会撞回 ASIN1 的商品标识符:一枚全新未用过的 UPC,或品类有 GTIN 豁免(标识符留空)。
- Catalog 表格及其 Live Listings、Catalog Lookup、Publish Queue 标签页(由 SellerSheet 侧边栏创建)。
- 仅变体子体:动手前先记下父体 SKU、变体主题(variation theme)和主题属性值——最后一步要恢复变体关系。
绝对不能复用旧 UPC
亚马逊匹配 GTIN 的优先级高于标题。SKU2 若带着 ASIN1 的旧 UPC 提交,会直接挂回 ASIN1——新 ASIN 根本不会产生。这一个失误是整个流程失败的头号原因。
侧边栏使用技巧
四个习惯让整个流程"自带说明书":
- 侧边栏菜单必须与当前标签页一致。每个分组(Live Listings、Catalog Lookup、Publish Queue……)都是标签页专属的——侧边栏上写着 "active tab must match"。按钮点了没反应,先看表格底部当前激活的是哪个标签页。
- hover 任意按钮即可看到它的功能说明,点之前先看一眼。
- 看单元格备注(cell note)。表头单元格带有备注(角上的小标记),说明这一列怎么用、接受什么值、有什么示例——悬停即可阅读。
- Publish Queue 第 4 行就是内置手册。每一列属性的第 4 行都给出显示名 + 格式提示和示例(如
[P9_type_value_pair → split] Externally Assigned Product Identifier · Type);第 5 行是服务端读取的代码键。
阶段一:先把一切备份好
痛点
这个流程会主动删除一条在售 listing。如果出了岔子而你没提前把每个属性都留底,你就得凭记忆重建 listing——标题、五点、尺寸、合规字段,全部。
1a. Live Listings——备份"你提交过的"版本
打开 Live Listings 标签页,Store 列填店铺、Sku 列填 SKU1,点侧边栏 Live Listings → Fetch by SKU。该行填充后,Json 列以 JSON 格式完整备份了这条 listing 的所有属性,这就是你的还原底稿。同时记下 Asin 列的值,即 ASIN1。
1b. Catalog Lookup——备份"亚马逊实际接受的"版本
切到 Catalog Lookup 标签页,填店铺和 ASIN1,点侧边栏 Catalog Lookup → Fetch by ASIN。这一份是亚马逊目录端的规范化数据——既能看出亚马逊改写了你的哪些字段,也是之后开 case 的证据。
阶段二:创建新 ASIN
痛点
你没法直接"向亚马逊要一个新 ASIN"——目录系统的存在就是为了防重复。原样提交同一个商品,亚马逊会把新 SKU 直接绑回你正想逃离的那个旧 ASIN。
这一阶段要走的是一个平衡。新 listing 必须与旧 ASIN 属性一致,因为阶段四开 case 的前提就是两个 ASIN 是同一个产品。但如果提交得完全一致,亚马逊会判定这个产品已经存在,把新 SKU 绑到旧 ASIN 上;如果区别太大,创建后再改回去有时会改不成功。
所以做法是:沿用旧 listing 的所有属性,只对 Item Name、Item Highlight、Bullet Point、Product Description 四个文案字段做部分修改,让亚马逊以为是一个新产品。等新 ASIN 创建成功后,再把这四项改回与旧 ASIN 完全相同的内容(阶段三第 1 步)。
1. 把商品载入 Publish Queue
切到 Publish Queue 标签页,按侧边栏的编号分组操作:
- 第 3 行填 Store 和 Listing Locale(如
en_US)。 - 数据行 productType 列填入 Live Listings 备份里的 Product Type(如
HEADPHONES)。 - 点 Get Template——按这个类目加载全部属性列,相当于在后台下载对应类目的 Excel 批量模板,但直接在表格里。
- sku 列填 SKU1,点 Fetch by SKU——整行属性被拉入。
2. 把这一行改造成"新品"(SKU2)
| 列 | 改成 |
|---|---|
| sku | SKU2——如 KB-2088-BLK-08141030(SKU1 + 时间戳) |
| operationType | UPDATE |
| externally_assigned_product_identifier#1.value | 新 UPC——GTIN 豁免则留空 |
| externally_assigned_product_identifier#1.type | upc——GTIN 豁免则留空 |
| supplier_declared_has_product_identifier_exemption | GTIN 豁免填 true;否则留空 |
| product_site_launch_date | 若为旧 listing 的历史上架日期则清空 |
| item_name / title_differentiation / bullet_point / product_description | 部分修改(见下) |
为什么新建也用 UPDATE?UPDATE 提交的是整条 listing:SKU 不存在时就是创建,SKU 已存在时就是覆盖更新。所以这里不需要单独的"创建"操作,SKU2 填 UPDATE 即可。
部分修改,不要推倒重写。只动这四个文案字段,幅度够让查重认为是新品即可——标题换结构、亮点换说法、五点和描述换措辞。改得太少,SKU2 会被合并回 ASIN1;改得远超这四个字段,后面把原文改回去有时会失败。其余属性与旧 listing 保持完全一致。
如果 SKU1 是变体子体,同时清空 parentage_level、child_parent_sku_relationship、variation_theme 和主题属性(如颜色/尺寸)——先以独立品创建,变体最后再恢复。
3. 同批加一行 SKU1 的 DELETE
在下一空行,sku 列填 SKU1,operationType 选 DELETE。删除行只需要这两格。创建 SKU2 的同时删除旧 listing,腾出 SKU1,阶段三才能用它重建到新 ASIN2 上。
4. 校验并提交
点 Validate (Preview),到 Submission Log 标签页确认无 ERROR 级问题——校验只是预览,不会发布任何东西。干净之后点 Create/Replace/Del. 提交(≤20 行即时生效、按每行 operationType 分发;更大批量用 Submit Feed)。
5. 验证 ASIN2 诞生
等 10–15 分钟。在 Live Listings 拉取 SKU2,读 Asin 列,那就是 ASIN2。关键校验:ASIN2 ≠ ASIN1。也可以在卖家平台交叉确认。
拿回来的还是旧 ASIN?
如果 SKU2 返回的是 ASIN1,说明被亚马逊合并了——四个文案字段的差异不够(或者标识符撞了)。删掉 SKU2,加大这四个字段的修改幅度,重新提交。
阶段三:把你的 SKU 重建到新 ASIN 上
痛点
ASIN2 有了,但它挂在一个一次性 SKU 上、顶着占位文案。你真正的 SKU——FBA 库存、广告、运营全都围着它转的那个——已被删除、无家可归。而且如果两个 ASIN 看起来不像同一个商品,客服会拒绝帮你搬库存。
1. 先把原版文案写回 SKU2
重建 SKU1 之前,先把阶段一 Live Listings 备份里的原版文案复制回 SKU2 行,以 operationType=UPDATE 提交。列名对应关系:
列名对应——备份标签页 → Publish Queue
- Item Name →
item_name - Item Highlight →
title_differentiation - Bullet Point →
bullet_point - Product Description →
product_description
Live Listings / Catalog Lookup 用显示名;Publish Queue 第 4 行是显示名、第 5 行是代码键。
为什么重要:这一步让 ASIN2 的属性与 ASIN1 完全一致。阶段四开 case 时,客服就没法以"两个 ASIN 属性不一致、代表不同产品"为由拒绝映射。提交后再到 Live Listings 拉一次 SKU2,确认仍然是 ASIN2。
同一次提交里,把标识符锁定到新 ASIN——确保之后的每次更新都落在新建的 ASIN 上(identifier 留空时,亚马逊有时可能再新建一个 listing):
| 列 | 填 |
|---|---|
| externally_assigned_product_identifier#1.value | ASIN2 |
| externally_assigned_product_identifier#1.type | asin |
| merchant_suggested_asin | ASIN2 |
| operationType | UPDATE(必须) |
标识符与 GTIN 豁免只能二选一:若创建 SKU2 时豁免列填了 TRUE(supplier_declared_has_product_identifier_exemption),这里必须先把 TRUE 删掉——它不能与 externally_assigned_product_identifier 同时存在。
2. 用 SKU1 和 ASIN2 重建
回到 Publish Queue:
- 这一行属性与 SKU1 完全一致,标识符也已在上一步指向 ASIN2——只需把 sku 改为 SKU1,
operationType=UPDATE。 - 确认 SKU1 已删除干净——Live Listings 用 SKU1 拉取,Json 列显示
SKU … not found即已删除;还能拉到就多等一会儿再查。 - Validate (Preview) → Create/Replace/Del.
3. 验证重建结果
- Live Listings——拉取 SKU1:Asin 列应显示 ASIN2。
- 卖家平台——Manage All Inventory 显示 SKU1 / ASIN2;Fix Stranded Inventory 显示 SKU1 / ASIN1。stranded(库存滞留)条目是预期现象——FBA 库存要到阶段四才会跟过来。
提交成功 ≠ listing 存在
亚马逊会"成功"接受对不存在 SKU 的操作。永远以 Live Listings 拉取结果或卖家平台实查为准——绝不能只看 feed 状态。
阶段四:搬 FBA 库存并收尾
痛点
listing 已经住进 ASIN2,但仓库里的每一件货还挂在 ASIN1 上——处于 stranded(库存滞留)状态、卖不了。走移除订单再重新发货,要花几周时间和真金白银。
1. 开 case
路径:卖家平台 → Help → Get support → Selling on Amazon → Products and inventory → Fix a product page。case 正文建议用英文提交,直接用这句(换成你自己的 SKU1 和 ASIN2):
They represent the same product. Thanks!
如客服要证据,提供 Manage All Inventory 截图和阶段一的 Catalog Lookup 备份,证明两个 ASIN 是同一商品。处理完成后 stranded 条目清零,库存在 ASIN2 下可售——不换标、不发新货件。
2. 收尾
- 删除 SKU2——库存映射完成后它只是 ASIN2 上多余的空 offer,会干扰定价和购物车。在 Publish Queue 加一行 DELETE 清掉。
- 恢复变体(仅子体)——补回
parentage_level=child、child_parent_sku_relationship、variation_theme和一个不与兄弟 SKU 冲突的主题属性值。 - 归档备份行、case ID 和时间线。
常见坑
| 坑 | 后果 | 规避 |
|---|---|---|
| SKU2 复用旧 UPC | 直接挂回 ASIN1——不产生新 ASIN | 新 UPC,或 GTIN 豁免且标识符留空 |
| 文案修改太保守 | 查重把 SKU2 合并进 ASIN1 | 四个文案字段做部分修改;永远验证 ASIN2 ≠ ASIN1 |
| SKU1 未释放就重建 | SKU 可能挂回旧目录数据 | 先确认 SKU1 已查不到;merchant_suggested_asin 必填 ASIN2 |
| 只信 feed 状态 | listing 可能实际没建上 | 以 Live Listings 或卖家平台实查为准 |
| 忘删 SKU2 | 同一 ASIN 上的重复 offer | 阶段四库存映射完成后清理 |
| 子体没先剥离变体属性 | 创建报错,或子体重新挂回父体 | 阶段二清空变体列;阶段四恢复 |
常见问题
需要换标或移动 FBA 库存吗?
不需要。FBA 库存绑定的是 FNSKU,整个流程中它从未改变。SKU 重建到新 ASIN 后,一个简短的 case 即可让亚马逊把现有库存重新映射——不走移除订单、不换标、不发新货件。
为什么临时 SKU 必须用新 UPC 或 GTIN 豁免?
亚马逊先按 GTIN 匹配,之后才看标题。临时 SKU 带着旧 UPC 提交会直接挂回旧 ASIN,新 ASIN 根本不会产生。用一枚未使用过的 UPC,或在品类允许时留空标识符并勾选 GTIN 豁免。
临时 SKU 拿回来的是旧 ASIN——哪里出错了?
要么标识符撞了(同一个 UPC),要么修改后的四个文案字段仍太相似,被亚马逊查重合并进了现有 ASIN。删掉临时 SKU,加大这四个字段的修改幅度,重新提交。
为什么 Fix Stranded Inventory 里显示我的 SKU 和旧 ASIN?
这是流程中段的预期现象。Manage All Inventory 显示 SKU 已在新 ASIN 上,而 FBA 库存在 case 处理前仍引用旧 ASIN。case 处理完成后 stranded 条目清零,库存在新 ASIN 下可售。
变体子体能翻新吗?
能。先记下父体 SKU、变体主题和主题属性值;创建临时 SKU 时清空变体列;最后把重建好的 SKU 重新挂回父体——主题属性值不要与现有兄弟 SKU 冲突。
为什么重建 SKU 前要先恢复原版文案?
case 能否通过,取决于两个 ASIN 是否明显是同一个商品。恢复原版标题、五点和描述后,新 ASIN 的属性与旧 ASIN 完全一致,客服就没有"是不同产品"的理由拒绝映射。